Intro
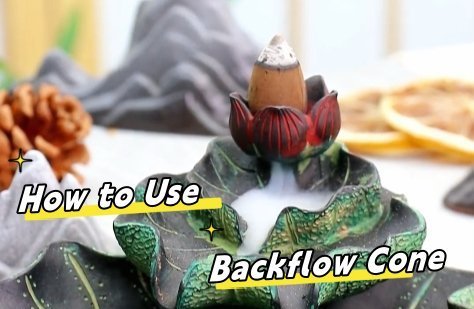
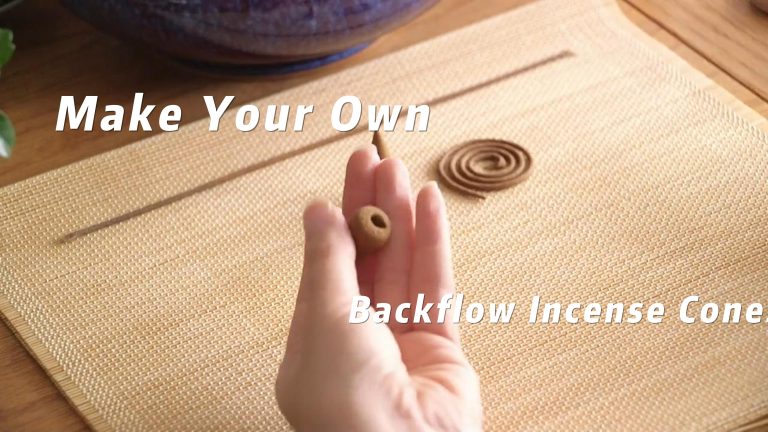
Backflow incense cones have become a popular choice for those seeking a calming and visually stunning experience. Unlike traditional incense, these cones are specially designed to produce a mesmerizing reverse smoke flow, where the smoke cascades downwards, creating a serene waterfall-like effect. The sight is not only beautiful but also adds a meditative atmosphere to any space. Crafted from natural ingredients like sandalwood, rose, agarwood, and nanmu, backflow incense cones offer a range of soothing aromas, making them perfect for enhancing relaxation or setting the mood for a peaceful environment. For people who wonder how to make backflow incense cones, this guide gives a step-by-step guide of making your very own backflow incense cones at home, using simple ingredients and tools.
Are Incense Cones The Same as Backflow? About Incense Cones and Backflow
Although regular incense cones and backflow incense cones may look similar, they serve different purposes and work in unique ways. Regular incense cones are designed to burn in a way that allows the smoke to rise upward. These cones release fragrance and smoke into the air, creating a relaxing atmosphere.
Backflow incense cones, on the other hand, are specially crafted to work with backflow incense burners, also know as incense waterfall. The key difference lies in the small hole at the base of backflow cones, which allows the smoke to flow downward rather than rise. This downward flow creates the mesmerizing “waterfall” effect that backflow burners are known for. Without this hole, regular incense cones will not produce the same visual effect. To learn more about this topic, you can read our article Backflow Incense Cones vs Regular Cones. If you want to learn more, you can read our article about how to burn backflow incense cones.
After understanding the difference between incense cones and incense backflow cones, then it is easy to understand that if you want to learn how to make incense cones, you can ignore the third step (create the hole for backflow). If you want to learn how to make incense backflow cones, you need to add Step 3 in your process.
Materials and Tools Needed to Make Backflow Incense Cones
List of Tools
Before getting started to make your DIY backflow incense cones, you need to prepare the following tools:
- Mixing bowl: To combine your ingredients.
- Spoon or spatula: Useful for mixing the powders and water.
- Mold (optional): For shaping the cones. A cone mold can help if you prefer perfectly uniform shapes. You can also make cone shape by hand.
- Small object or toothpick: For creating the air hole at the base of the cone, which is crucial for the backflow effect.
About Necessary Ingredients
To make your own incense backflow cones, you’ll need the following basic ingredients, along with suggested proportions to guide the process:
Incense Base Powder
The base powder forms the foundation of your incense cones and determines the overall burning quality. You can choose any combination of the following powders:
- Sandalwood: Known for its warm, calming scent.
- Agarwood: Offers a deep, earthy aroma.
- Cedarwood: Provides a fresh, woody scent.
- Alternative options: Pine, oak, or bamboo powders can also be used for a unique fragrance.
Binder
The binder is essential to hold the incense powder together and ensure the cone burns slowly and evenly:
- Makko powder: A traditional and odorless binder from tree bark.
- Tragacanth gum (gum arabic): Natural resin that dissolves in water to create a sticky texture.
- Xanthan gum: An easily accessible binder option
Water
Water activates the binder, allowing you to shape the incense mixture into cones. Add it slowly to avoid making the mixture too wet.
Suggested Proportions to Mix the Ingredients
To achieve the ideal balance for your incense cones, follow these proportions:
- 2 parts incense base powder (e.g., sandalwood, agarwood, or cedarwood)
- 1 part binder (e.g., makko powder or tragacanth gum)
- 1 tablespoon of water for every 4-5 parts of dry ingredients
Add water gradually while mixing, ensuring the dough is firm enough to hold its shape but not overly sticky.
Five Steps to Make Your Backflow Incense Cones
The above video gives an illustration of the steps about how to make backflow incense cones. Here is a detailed breakdown of the process.
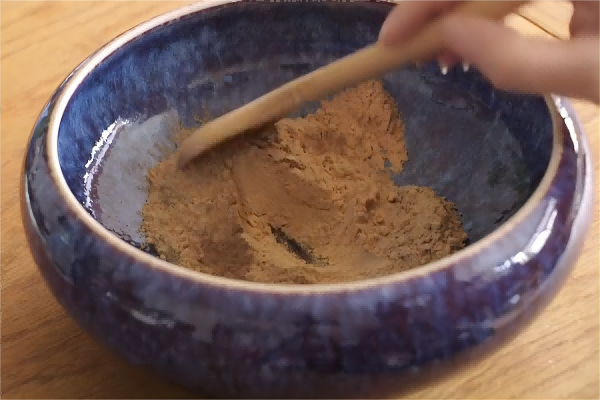
Step 1: Mix the Ingredients
The first step is to prepare the dough-like mixture for your incense cones. Follow these tips to achieve the right consistency:
- Combine the powders: In a mixing bowl, add your chosen incense base powders (e.g., sandalwood, agarwood, or cedarwood) along with the binder (such as makko powder or tragacanth gum).
- Tip: Start with 2 parts base powder and 1 part binder. You can adjust this ratio slightly depending on the texture you’re aiming for.
- Add water gradually: Slowly pour in water, a small amount at a time (about 1 tablespoon per 4-5 parts dry mixture).
- Pay attention: Knead the mixture thoroughly between water additions to avoid making it too wet. The goal is to form a dough that is firm yet moldable.
- Knead until smooth: Once the dough is well-combined, continue kneading it until the texture is soft but not sticky. It should feel like a pliable clay that holds its shape when rolled or pressed.
Step 2: Knead Until Smooth
Once the water has been added, the next step is to knead the mixture to ensure it is smooth and consistent. Proper kneading will help create a dough-like texture that is easy to mold into cones. Follow these tips to knead effectively:
Knead the Dough Thoroughly
- Begin kneading the mixture by hand: Using your hands, work the dough by pressing and folding it over itself. This will help distribute the moisture evenly and ensure that the binder activates fully.
- Check for consistency: The dough should feel smooth and slightly pliable but firm enough to hold its shape when molded. If it’s too sticky, add a little more base powder. If it’s too crumbly, add a small amount of water.
Tips for Smooth Kneading
- Kneading time: Spend about 3-5 minutes kneading the dough to ensure a consistent texture throughout. Proper kneading prevents lumps or uneven moisture distribution, which can cause the cones to crack or burn unevenly.
- Pay attention: As you knead, check that the dough isn’t too wet or dry. It should feel like soft clay—easy to work with but not so soft that it sticks to your hands.
- Troubleshooting: If you notice dry patches, sprinkle a little water on the dough and continue kneading. If the dough becomes too wet, dust it with a small amount of base powder and continue until it reaches the desired consistency.
End Result
- Soft but firm dough: The goal is to create a smooth, soft dough that is easy to shape into cones. It should hold its form without cracking but not be sticky. The better the dough is kneaded, the easier it will be to shape and dry your cones
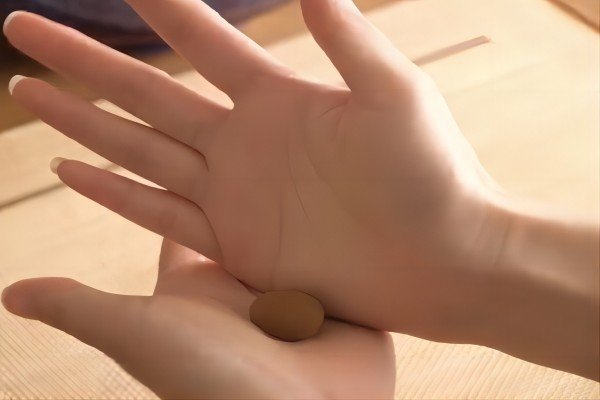
Step 3: Shape the Cones
Now that your dough is ready, it’s time to shape the cones. You can either use your hands or a cone mold for this step:
By hand
- Pinch and roll: Take a small portion of the dough (about the size of a marble) and roll it between your fingers or palms to form a ball. Then, gradually shape it into a cone by pressing and molding the base flat while tapering the top.
- Tips for perfect cones:
- The base should be wider and flat to ensure stability when burning.
- The cone should taper smoothly to a point at the top, which will be where you light the incense.
- Pay attention: Make sure the cone is compact, without cracks or loose areas. Air pockets or cracks can cause uneven burning, leading to poor smoke flow.
Using a mold
- Fill the mold: If you prefer perfectly uniform cones, use a cone mold. Gently press the dough into the mold, making sure it is tightly packed without gaps.
- Release the cone: Carefully remove the cone from the mold, ensuring the shape stays intact. Molds are ideal for creating cones with smooth, even sides, which can enhance the aesthetics of your incense.
So Which Is Better?
It depends on your personal preferance. Shaping backflow incense cones by hand allows for creativity and customization, giving each cone a unique, artisanal feel. However, using a mold ensures consistency and efficiency, producing smooth, uniform cones with ease. If you prioritize a professional look and faster production, molds are ideal, while hand-shaping is better suited for those who prefer a personal, artistic touch .
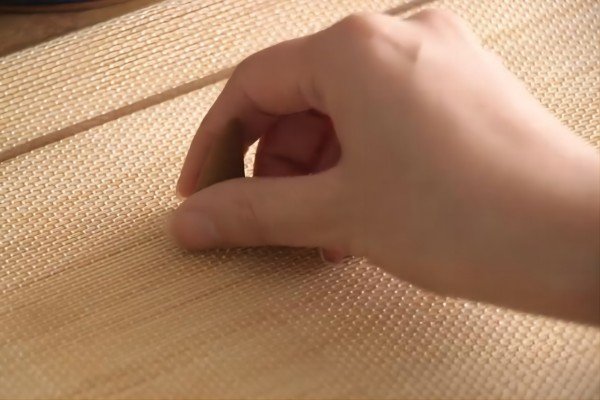
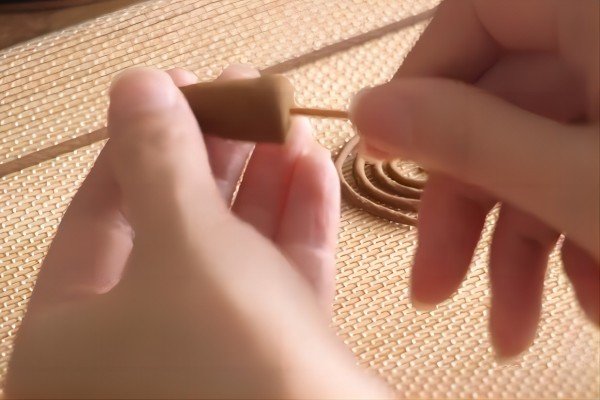
Step 4: Create the Hole for Backflow (Specially for Backflow Incense Cones)
This step is crucial for the proper functioning of your backflow incense cones. If you want to make incense cones, then you can just ignore this step. However, if you want to make your incense cones having the effects of waterfall and backflow, then this step is cricual.
The hole at the base allows the smoke to flow downward, creating the mesmerizing backflow effect.
- Poke a hole: Use a toothpick, skewer, or another thin, pointed object to poke a hole in the center of the cone’s base. The hole should go about halfway up the cone but not all the way through the top.
- Tip: Gently twist the toothpick to ensure the hole is smooth and even. If the hole is too small or blocked, the backflow effect won’t work properly.
- Pay attention: Make sure the hole is clear and clean, as even a slight blockage can disrupt the smoke’s downward flow. Check by looking through the hole after you’ve made it
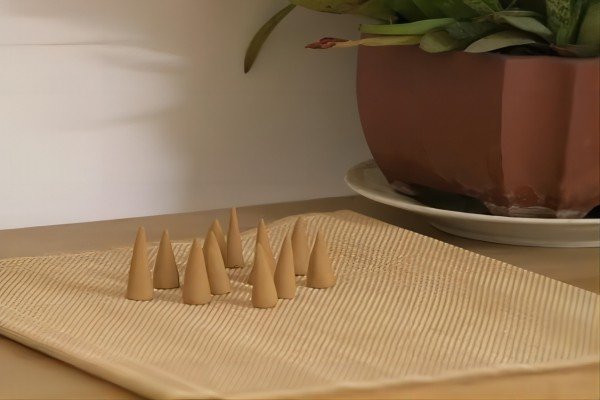
Step 5: Dry the Cones
Proper drying is essential to ensuring that your cones burn evenly and produce the desired backflow effect. Follow these drying tips for the best results:
- Drying process: Place your cones on a flat, dry surface (such as parchment paper or a wooden board) in a cool, well-ventilated space. Avoid direct sunlight, as it can cause the cones to dry too quickly and crack.
- Tip: Leave enough space between each cone to ensure air can circulate around them. This promotes even drying.
- Drying time: Allow the cones to dry for at least 24-48 hours, depending on the humidity of your environment. Check if the cones are fully dry by lightly pressing them—if they feel firm and hard, they’re ready.
- Pay attention: If the cones are not fully dried, they may crack or not burn properly. Patience is key in this step.
- Test a cone: Once dried, burn one cone to ensure it burns evenly and produces the backflow smoke. Light the tip, let it catch fire for a few seconds, and then blow it out. Place it on a backflow incense holder and observe the smoke as it flows downward. If the smoke flows correctly and the cone burns smoothly, your cones are ready for use
More Customized: How to Make Good-Smelling and Colorful Backflow Incense Cones?
But this is not enough right? The above tutorial is only about making basic backflow incense cones. After all, there are so many colorful backflow incense cones of different scents. So how to make incense cones of different scents and colors?
How to Make the Incense Cones You Make Smell Good
We notice that there are many people complaing about the backflow incense cones they buy on amazon or the marketplace smell bad. That is why they want to make their own diy incense burners. This is also why diy incense is so amazing by giving you the ability to customize the fragrance to suit your personal preferences. Here are some ways to add unique, pleasant scents for your homemade diy incense cones:
Choice 1: Aromatic Powders
Aromatic powders is an ideal choice to make good smelling backflow incense cones. Aromatic powders not only contribute to the fragrance but can also influence the overall mood of the incense experience. Here are some suggestions:
- Floral powders: Rose, jasmine, lavender, and chamomile powders are excellent choices for a soft, floral scent. They are known for promoting relaxation and a calming atmosphere.
- Herbal powders: Add a refreshing twist by using herbs like mint, rosemary, sage, or lemongrass powder. These create a fresh and invigorating scent, ideal for energizing spaces.
- Spice powders: Cinnamon, clove, or cardamom powders can add a warm, spicy fragrance that brings a sense of comfort and coziness to your incense cones.
- Citrus powders: Dried citrus peels (like orange or lemon) can be ground into a fine powder and mixed into your cones to add a bright and uplifting scent.
For readers who want to know more about these aromatic powders and their profiles, you can read our article 8 Best Smelling Incense You Must Try.
Experiment with different combinations of powders to create unique blends. For example, mixing rose powder with sandalwood can create a warm, floral fragrance, while combining lavender and mint powder can produce a relaxing yet refreshing scent. Aim for:
- 2 parts base powder (such as sandalwood)
- 1 part aromatic powder (like rose or jasmine)
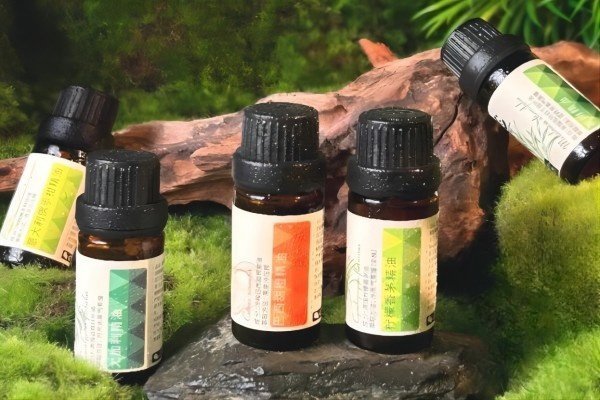
Choice 2: Essential Oils
To make good smelling backflow incense cones, your another choice is to add essential oil. Essential oils offer a powerful way to intensify or complement the fragrance of your incense cones. Adding them in small amounts can create richer and more complex scents:
- Floral oils: Lavender, rose, and geranium oils work well to enhance floral aromatic powders.
- Woodsy oils: Sandalwood, cedarwood, and patchouli essential oils pair well with wood powders, giving a grounding, earthy quality.
- Citrus oils: Lemon, orange, and bergamot oils can add a zesty freshness to your cones, especially when paired with herbal powders.
- Spice oils: Clove, cinnamon, and ginger essential oils offer a warm and spicy aroma that is perfect for creating a cozy atmosphere
When using essential oils, it’s important to strike the right balance. Too much oil can make the cones difficult to shape or cause them to burn improperly. As a guideline:
- 2-3 drops of essential oil per cone is generally sufficient to add fragrance without affecting the structure.
- Be sure to mix the oils evenly into your dry powders before adding water to ensure a consistent scent throughout the cone
Small Tips About How to Make Good-smelling DIY Incense Cones
- Test small batches: Make small sample batches with different combinations of aromatic powders and essential oils to see what works best for you.
- Seasonal scents: Tailor your cones to the season—use cinnamon and clove for a cozy winter fragrance, or opt for lemongrass and mint for a fresh summer vibe.
- Themed blends: Create specific blends for different moods, such as relaxing (lavender and sandalwood), energizing (mint and citrus), or grounding (agarwood and patchouli)
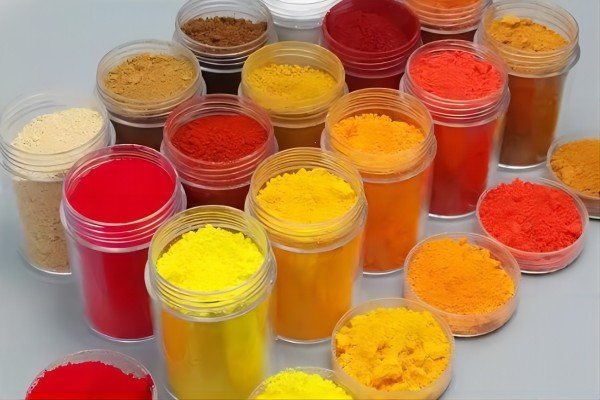
How to Make Colorful Backflow Incense Cones
Adding color to your incense cones can make them visually appealing while still maintaining their natural beauty. You can use natural dyes or mica powders to achieve this.
Choice 1: Natural Dyes
Using natural powders or plant-based dyes allows you to create soft, earthy tones for your incense cones. Some common options include:
- Turmeric powder: Provides a rich yellow or golden hue. It adds warmth and vibrancy, perfect for a sunny, uplifting vibe.
- Beetroot powder: Gives a reddish or pinkish tint. Beetroot powder can be used if you want a subtle yet beautiful color to your cones.
- Spirulina or matcha powder: Both of these provide natural green shades. Spirulina will give you a deeper green, while matcha provides a lighter, grassy hue.
- Cocoa powder: For a deep brown color, you can add cocoa powder, which also gives a slight chocolatey scent
To achieve a balance between scent and color:
- 1-2 teaspoons of natural dye per batch (depending on the desired intensity) mixed with your base powders.
- Start with small amounts and gradually increase if you want a stronger color, being mindful not to overpower the fragrance.
Choice 2: Mica Powders:
Mica powders are mineral-based pigments that give a shimmering, vibrant color to your cones. Although they don’t affect the scent, they can create striking, metallic colors such as gold, silver, or vibrant pinks and blues:
- Gold and silver mica: Add a luxurious touch to your cones, perfect for special occasions or decorative pieces.
- Vibrant colors: Use pink, blue, purple, or green mica powders to create cones that stand out visually. These are great for personalizing cones for different settings or moods.
To achieve an ideal effect, you need to
- Use about ½ teaspoon of mica powder for each batch of incense dough. Mica powder is highly concentrated, so a little goes a long way.
- Make sure to mix it thoroughly with the dry powders before adding water to ensure even color distribution.
Small Tips For How to Make Scented and Visually Appealing Backflow Incense Cones
Tip 1. Test Small Batches
- Before making a large batch, always test a smaller one to find the right combination of ingredients. This ensures that the cones hold their shape, burn properly, and produce the desired fragrance.
- Experiment with different ratios of base powders, binders, and oils to perfect the burn time and scent intensity.
Tip 2. Be Mindful of Essential Oil Amounts
- Essential oils are potent, and too much can make the cones hard to burn. Stick to 2-3 drops per cone to maintain the right balance between fragrance and burnability.
- Mix oils thoroughly with the dry powders before adding water for an even scent throughout the cone.
Tip 3. Customize Colors Thoughtfully:
- When using natural dyes or mica powders, remember that less is often more. Start with a small amount and build up to your preferred color intensity.
- If using multiple colors, mix in small batches and experiment with marbling or layering effects for a unique look.
Tip 4. Ensure Proper Drying:
- Allow your cones to dry fully for 24-48 hours in a cool, dry place. Rushing the drying process can lead to cracks or uneven burning.
- Test one cone after drying to check for any inconsistencies before drying the entire batch.
Special Cautions to Successfully Make Incense Cones
Crafting perfect backflow incense cones requires attention to detail. Here are some key precautions and tips to ensure the best results:
Tip 1. Use the Right Amount of Water
Adding too much water can make the mixture sticky and hard to shape, while too little can make the dough crumble. Slowly add water until the dough is pliable but firm. The ideal texture should be like modeling clay—easy to shape but not too wet. If the dough becomes too soft, add more base powder or binder.
Tip 2. Avoid Overly Thick or Thin Cones
The thickness of your cone is important for an even burn. Cones that are too thick may burn unevenly, while cones that are too thin can burn too quickly. Aim for a base that is wide enough for stability but not excessively thick. A cone about 1 to 1.5 inches tall with a stable, flat base works best.
Tip 3. Ensure a Clear Air Passage
For the backflow effect to work properly, the hole at the base must be clear and precise. Use a toothpick or skewer to poke the hole, making sure it reaches about halfway up the cone. Twist the toothpick to smooth out the hole, as any obstruction will disrupt the smoke flow.
Tip 4. Allow Ample Drying Time
Drying the cones is crucial to their performance. Cones should dry in a well-ventilated, cool area for at least 48 hours. Avoid rushing the process by placing cones in direct sunlight, as this can cause cracks or uneven drying, leading to improper burning.
Tip 5. Test Burn a Cone
Before making a large batch, test a cone to ensure it burns smoothly and the backflow effect works. Light the tip, let it smolder, and observe the smoke flow. If the smoke doesn’t flow down properly, check the hole size, cone shape, or dryness, and make adjustments accordingly.
Conclusion
Making your own backflow incense cones is a rewarding process that allows for creativity in both scent and appearance. By following the steps and tips outlined in this guide, you can craft beautiful, functional cones that produce a mesmerizing backflow smoke effect, adding a calming atmosphere to any space.
FAQ
No, regular incense cones are not designed to create the backflow effect. They don’t have the hole at the base that allows the smoke to flow downward. Backflow incense cones are specially made with this design to work with backflow burners.
To make backflow incense cones, ensure you create a small hole at the base of the cone during shaping. This hole allows the smoke to flow downward instead of rising, creating the signature backflow effect. Regular incense cones don’t have this hole, so they won’t produce the same result.
If your incense cones aren’t producing a backflow effect, it may be due to one of several reasons:
- The hole at the base may be blocked or too small.
- The cones may not be fully dry, which affects how they burn.
- Ensure that you’re using a proper backflow burner and that your cone is placed correctly
Yes, backflow incense burners require specially designed backflow cones. These cones have a small hole at the base that directs the smoke downward, creating the waterfall-like effect. Regular cones won’t work with backflow burners